
Learning the friendly way
Dive into our resources, guides, and articles for all things money-related. Grow your financial confidence with our experts curated tips and articles for both experienced and new investors.
LATEST ARTICLEs
-your-emergency-fund.png)
We've all been caught off guard with an emergency payment - from having to replace an appliance to an unexpected medical bill. These things happen and they're out of our control, so it's best to be prepared. Emergency funds are the best way to protect yourself, and a great way to start building your savings.
These unforeseen expenses shouldn't cripple your savings. With an emergency savings fund, you can recover more quickly and get back on track to achieving your financial goals with little to no stress.
What is an emergency fund?
An emergency fund is easily accessible money stored in a bank account set aside specifically for unexpected expenses or financial emergencies, anything from medical expenses to a loss of income. Emergency savings are typically used for unplanned expenses that fall outside of your normal monthly spending, with the funds stored in a savings account.
These funds allow you to weather the storm and avoid the need (and costs) of taking out a high-interest loan or credit card debt. Keeping the funds in a savings account removes the temptation to spend it, as would be the case if you stored the funds in a checking account.
Why emergency savings are important
Emergency or unexpected expenses without the proper precautions can quickly turn into debt or take a toll on your savings goals. And if hit with two or more in a row, this might cause long-term consequences that cause havoc on your finances.
Rather rest assured knowing that you have an emergency fund in place should something unexpected happen than fall back on costly loans and credit cards, or even other savings accounts like your retirement savings.
Emergency funds play an essential role in any reliable financial plan, providing peace of mind and a buffer for your other savings accounts. These funds can be used during periods of unemployment, the sudden death of a family member, illness and disability, or emergency home and auto repairs. Never underestimate the importance of an emergency fund and its impact on your financial well-being should something go wrong.
Start your emergency fund with these 7 simple steps
1. Review your monthly budget and see where you can save
It's critical to understand where your money is going so you can find ways to save it. Budgeting allows you to maximize your income and discover methods to decrease or control your spending.
To do this you can sit down with a financial advisor, or take matters into your own hand with your checking account statements, a pen and paper or a budgeting app. Be sure to review both your checking and savings accounts to get a clear picture. This is the first step in improving your financial health, and to start building your emergency fund.
2. Establish a goal amount for your emergency fund
A budget is a plan for spending that helps you figure out how much money you'll need each month to meet your essential expenses. A general rule of thumb when looking to build an emergency fund goal is to aim for six months' worth of income, enough to cover monthly expenses for housing, food, and transportation.
Don't be discouraged by how long this will take, rather establish a goal to work towards and move forward in that direction. Ideally, you want to be able to cover your living expenses for six months.
3. Create a direct deposit to your savings account
Avoid temptation by setting up a direct deposit from your current bank account (or wherever you receive your income) to your savings account. Better yet, you can create a split direct debit which allows you to automatically allocate funds to various accounts, including retirement funds etc.
If you're new to saving, experts recommend starting with an emergency fund, and once you've established this, move on to other savings accounts. If you already have a retirement fund or money market account set up, continue with this while building your emergency fund.
4. Little by little increase your savings
Increase the amount you're putting into your emergency fund by 1 percent or a certain amount over time until you've reached your savings goal. Increasing amounts gradually might help to make the smaller deposit into your checking account seem less noticeable and steadily build financial security.
5. Direct any unexpected income straight to your savings accounts
Commit to redirecting any unexpected income to your emergency fund, at least until you have reached your saving goal. This might be money from a bonus, inheritance, a tax refund, lottery winnings etc.
6. And once you've reached your goal? Save some more
Being unemployed for more than a year or being hospitalized for several months are both situations that require more than a six-month cushion. Should you find yourself here you’ll be glad you have more money saved in your emergency fund.
7. Find a bank account with perks that can kickstart your savings
When opening new checking or savings accounts, shop around by observing bank or credit union offers. Some banks offer cash incentives to new customers. Use this to kickstart your emergency fund, or to add a little extra to an already established one.
In conclusion
An emergency fund provides a cushion for unplanned events and can help you avoid taking on credit card debt or taking out a personal loan. By putting your emergency money in a high-yield savings account as opposed to checking and savings accounts, you can earn interest while you save money and build your nest egg.
Having an emergency fund saved in a separate account prevents you from spending the money and ensures that it is accessible in the case of an emergency. Emergencies can occur whether or not you are prepared; as a result, being prepared is the best way to deal with a potentially difficult scenario.
Moving money across borders shouldn’t feel like sending a letter in the mail or using a pigeon. Yet for many businesses, that’s still the reality. They often have to deal with delays, hidden fees, and limited visibility. Recently, stablecoins have proved that this process can be more reliable and efficient, offering near-instant global transfers. But to truly unlock their potential, one key piece of infrastructure needs to work in the background: on-ramps and off-ramps.
These systems act as the bridge between traditional banking and blockchain networks, allowing businesses to move between fiat currencies (like dollars, euros or pounds) and stablecoins. So, let’s dive in and understand what they can do for your business.
How Traditional Payment Rails Still Set the Pace
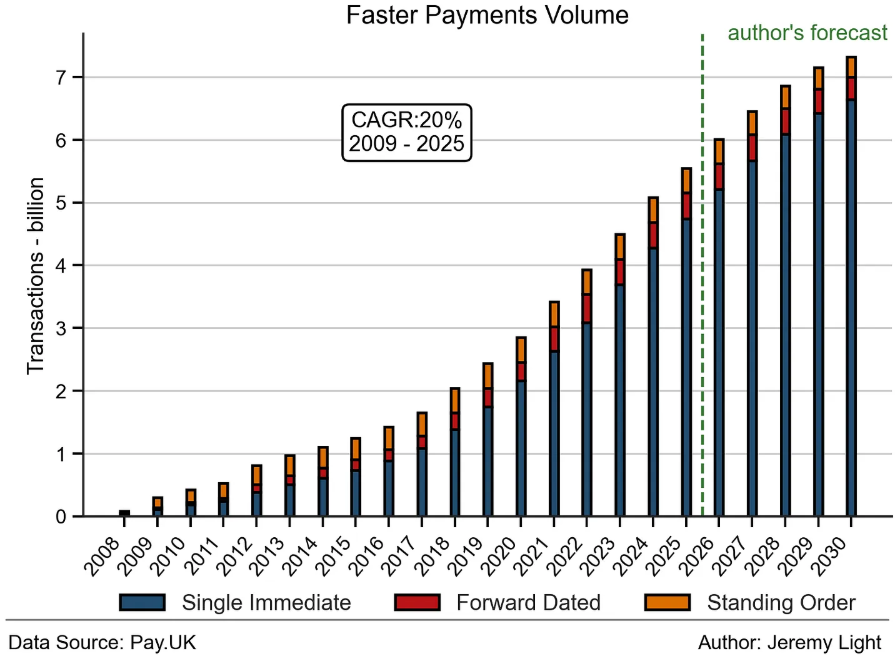
Before money reaches the blockchain, it starts its journey through traditional banking systems. In Europe, this typically means SEPA transfers, while in the UK, businesses rely on Faster Payments.
SEPA transfers are widely used across the Eurozone and can take anywhere from a few hours to a full business day, depending on the bank and timing. Faster Payments, on the other hand, lives up to its name, often settling within seconds and operating 24/7.
These systems are reliable, of course, but they still operate within frameworks and banking hours that can introduce delays or friction. This is where stablecoins come in, not to replace these rails necessarily, but to enhance what happens after the money moves.
Why Stablecoins Change the Game
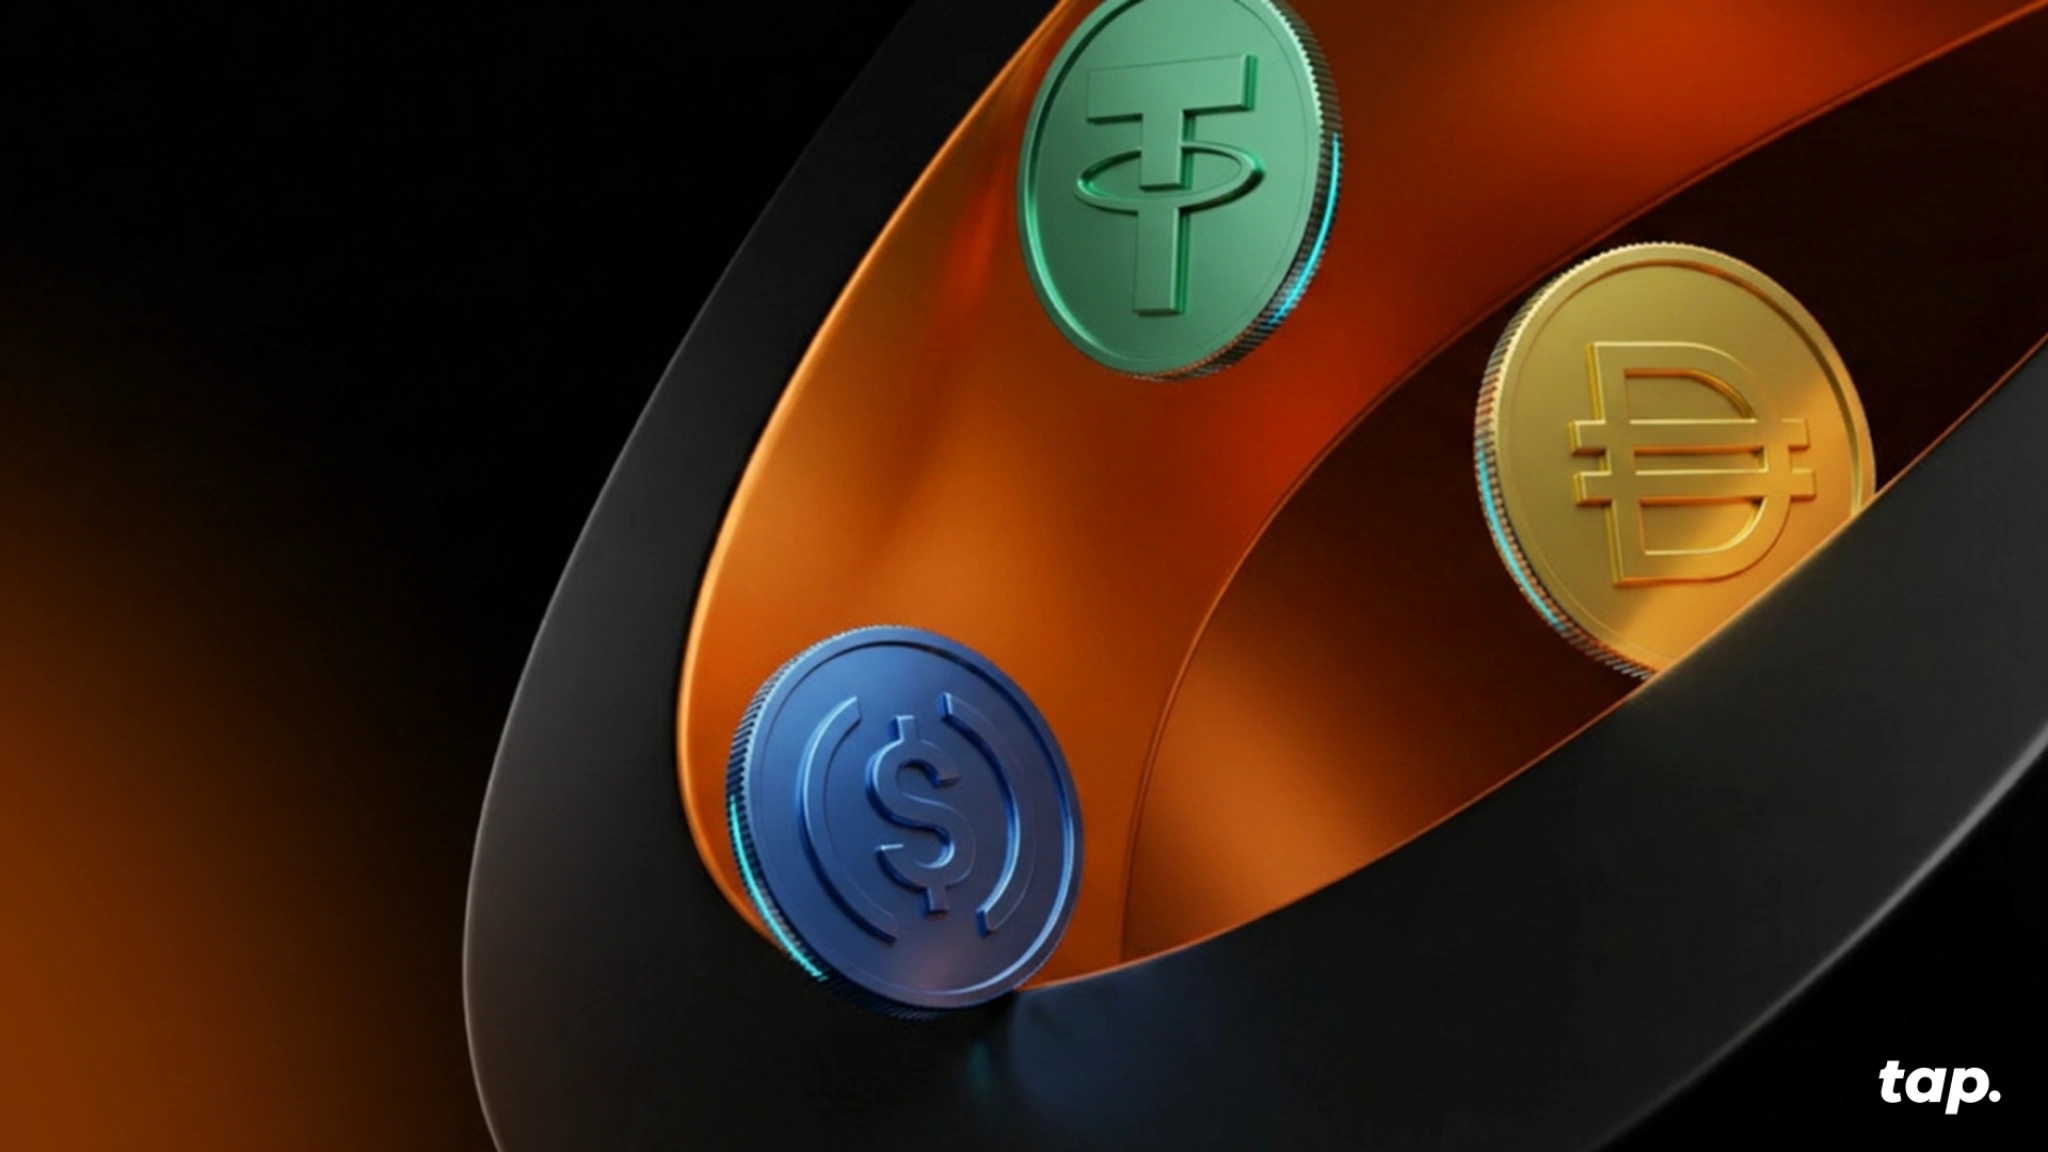
Stablecoins like USDT and USDC are designed to maintain a stable value, typically pegged to the US dollar. Unlike traditional bank transfers, they operate on blockchain networks that run continuously, without downtime or geographic limitations.
Once funds are converted into a stablecoin, they can be transferred globally in seconds, at any time of day. This makes them an ideal settlement layer for businesses dealing with international payments, treasury management, or cross-border operations.
While USDT is widely used for liquidity, trading, and global transfers, USDC is often favored in regulated environments due to its transparency and compliance focus. Both serve similar purposes, but the choice often depends on the specific needs of the business.
The Role of Virtual Accounts
A key innovation behind modern on-ramps is the use of virtual accounts. A virtual account is a digital identifier that you may see formatted as an account number or IBAN. When funds arrive, the system automatically knows who they belong to. This conveniently allows for instant reconciliation of incoming payments and scalability without manual intervention.
For businesses handling high volumes of transactions, this is essential. It ensures that funds can be tracked, attributed, and processed before being converted into stablecoins.
The On-Ramp: Fiat to Stablecoin
The on-ramp process is what turns traditional money into digital assets. While it may sound complex, it typically follows a straightforward flow:
- A business sends fiat (e.g., EUR or GBP) via SEPA or Faster Payments
- The funds arrive and are automatically attributed via a virtual account
- The system triggers a conversion into a stablecoin like USDT or USDC
- The stablecoin is delivered to a designated wallet
If the initial transfer is instant (as with Faster Payments), the entire process can complete in minutes. If not, the blockchain leg still executes immediately once the fiat funds settle.
The Off-Ramp: Stablecoin to Fiat
The off-ramp works in reverse, converting stablecoins back into traditional currency:
- The user sends stablecoins to a provider’s wallet
- The system confirms receipt and initiates conversion
- Fiat is sent to a bank account via SEPA or Faster Payments
Again, the speed depends largely on the fiat rail used. The blockchain portion remains fast and efficient, while the final step relies on the capabilities of the local banking system.
Where Friction Still Exists
While stablecoins remove many inefficiencies, they don’t eliminate all friction.
Fiat systems can still introduce:
- Processing delays, especially during non-business hours
- Compliance checks, which may pause large or unusual transactions
- Regional limitations, depending on banking infrastructure
These factors mean that while stablecoin transfers are instant, the entry and exit points still depend on traditional systems.
Why This Matters for Businesses
Settlement speed isn’t just a technical detail, it has financial implications.
When payments take days to clear, capital gets tied up in transit. This affects cash flow, limits flexibility, and introduces uncertainty into planning. Businesses often compensate by holding larger reserves, which takes a toll on a business’s overall efficiency.
Stablecoin infrastructure changes that equation. By enabling near-instant settlement once funds are on-chain, businesses can move capital faster, reduce idle balances, and gain clearer visibility over their operations. For companies operating globally, it’s a whole shift in how money moves.
Streamline Your Stablecoin Operations with Tap
If your business is ready to move beyond traditional banking limitations and tap into the speed and efficiency of stablecoins, Tap's crypto business account gives you everything you need in one platform.
Get your own individual IBAN and access payment accounts in major national currencies like EUR, GBP, and more, with full support for SEPA Instant and Faster Payments. This means you can handle fiat on-ramps and off-ramps seamlessly, moving between traditional currency and digital assets without juggling multiple providers or waiting for slow bank transfers.
Tap also supports pair-agnostic trading across over 70 cryptocurrencies, including major stablecoins like USDT and USDC. Whether you're converting fiat to stablecoin for faster settlement or moving capital across borders, Tap's platform is built to move as fast as your business does.
Ready to experience the future of global payments? Get in touch here.

If you’ve ever wondered why sending crypto can sometimes feel instant and other times slow, or why some transactions cost pennies while others rack up fees, you’re not alone.
Behind the scenes, blockchains aren't just a single piece of technology. They're more like a multi-level system of interconnected parts, where each layer handles a different job.
Think of it like a city. You have roads, traffic systems, buildings, and apps that help you navigate it all. Blockchain works in a similar way. And once you understand these layers, the entire ecosystem starts to make a lot more sense.
Why Do Blockchains Need Layers?
At first glance, you might assume a blockchain is just a database that stores transactions. But in reality, it has to do much more:
- Store data securely
- Validate transactions
- Communicate across a global network
- Remain decentralized
- Scale to millions of users
Trying to handle all of this in one place quickly creates trade-offs. That’s why blockchains are designed in layers, so each part of the system can specialize and improve independently. But to really understand why this matters, we need to look at the core challenge all blockchains face.
The Blockchain Trilemma Explained
At the heart of blockchain design is a fundamental constraint known as the Blockchain Trilemma.
Every blockchain is trying to balance three key properties:
- Security: Protection against hacks, fraud, and manipulation.
- Decentralization: No single entity controls the network.
- Scalability: Ability to handle many transactions quickly and cheaply.
So, what’s the problem? It’s extremely difficult to maximize all three at the same time.
Imagine buying a $4 coffee with Bitcoin. You might pay more in fees than the coffee itself and wait several minutes for confirmation. Meanwhile, a card payment takes seconds. That’s the result of Bitcoin prioritizing security and decentralization over speed.
Newer blockchains try to improve scalability, but often introduce trade-offs elsewhere. This is why developers began thinking differently: instead of forcing one system to do everything, why not split responsibilities across layers?
That idea led to the layered architecture we see today.
The 5 Core Layers of Blockchain Architecture
Before diving into terms like Layer 1 or Layer 2, it helps to understand the foundational structure that powers every blockchain.
1. Infrastructure Layer (The Foundation)
This is the physical backbone of the network.
It includes:
- Computers (nodes) running the blockchain
- Servers and hardware distributed globally
These nodes store data and keep the network running 24/7. The more distributed they are, the more decentralized the system becomes.
2. Data Layer (Where Transactions Live)
This is where all blockchain data is stored.
Every transaction, block, timestamp, and cryptographic signature is recorded here. It ensures transparency, meaning anyone can verify transactions, and immutability, which prevents data from being altered. This is what gives blockchain its “trustworthy” nature.
3. Network Layer (Communication System)
Blockchains are global networks, and nodes need to talk to each other.
The network layer shares transaction data between nodes,and propagates new blocks across the system. Without this layer, the network wouldn’t stay synchronized.
4. Consensus Layer (Agreement Mechanism)
This is where decisions are made.
The consensus layer ensures all nodes agree on which transactions are valid and which blocks are added to the chain.
Different blockchains use different methods, like:
- Proof of Work (Bitcoin)
- Proof of Stake (Ethereum)
This layer is essential for maintaining trust without a central authority.
5. Application Layer (What Users See)
This is the part most people interact with.
It includes:
- Wallets
- DeFi platforms
- NFT marketplaces
- Games
Everything from swapping tokens to playing blockchain games happens here. It’s the “user-friendly” face of blockchain technology.
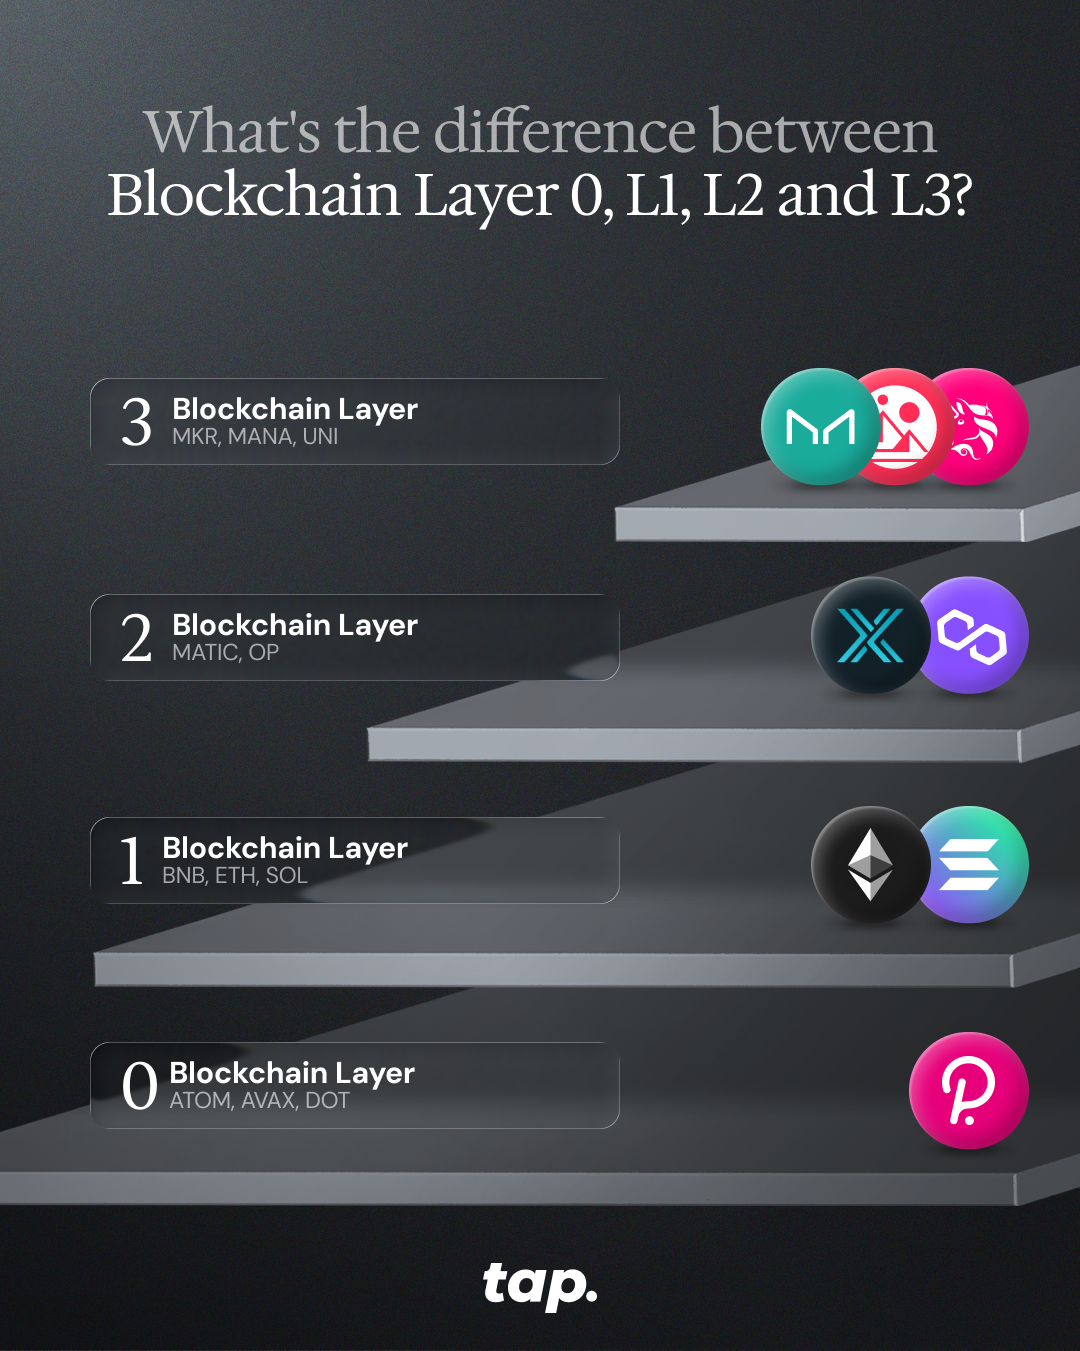
Understanding Layer 0, 1, 2, and 3
Now that we’ve covered the internal structure, let’s look at another way “layers” are used in crypto, so you don’t get them mixed up. This second meaning refers to different types of blockchain solutions.
Going back to our city analogy, Layer 1 is the foundation, Layer 2 is the infrastructure that improves traffic flow, and Layer 3 is where people actually live and interact.
Layer 0: Connecting the Ecosystem
Layer 0 sits beneath everything else and focuses on interoperability and infrastructure. Its goal is to make it easier for different blockchains to communicate and share data.
Instead of building a single blockchain, Layer 0 projects, such as Polkadot, provide the tools to create entire ecosystems of connected chains. This is especially important as the crypto space grows more fragmented.
- In practice, Layer 0 enables communication between different blockchains, shared security and infrastructure, and more flexible development of new networks.
You can think of it as the “internet of blockchains,” helping different systems work together rather than in isolation.
Layer 1: The Foundation of Trust
Layer 1 is the base blockchain itself. This is where transactions are recorded, validated, and secured.
- Networks like Bitcoin and Ethereum are classic examples. Their primary role is to provide security, by protecting the network from attacks, and consensus by ensuring everyone agrees on transaction history.
Different Layer 1s can take different approaches. Bitcoin focuses on simplicity and security, acting as a highly reliable ledge. Ethereum expanded on this by introducing smart contracts, allowing developers to build entire ecosystems of apps on top of it.
However, this strength comes with limitations. Because Layer 1 prioritizes security and decentralization, it can struggle with:
- Limited transaction throughput
- Higher fees during peak demand
- Slower confirmation times
This is a direct result of the blockchain trilemma we explained previously, and it’s exactly why Layer 2 solutions emerged.
Layer 2: Scaling Without Compromise
Layer 2 is designed to make blockchains faster and cheaper without sacrificing the security of Layer 1.
- Instead of processing every transaction on the main chain, Layer 2 solutions handle transactions off-chain or in batches, compress them into a single update, and send that update back to Layer 1 for final settlement.
This dramatically improves efficiency. For example:
- On Bitcoin, the Lightning Network enables near-instant, low-cost payments
- On Ethereum, rollups bundle thousands of transactions into one
The result is a better experience for all users by allowing for faster transactions, lower fees, and greater scalability. It’s worth remembering that Layer 2 doesn’t replace Layer 1; it builds on top of it, using it as a foundation.
Layer 3: Where Users Actually Interact
Layer 3 is where blockchain becomes tangible for everyday users.
- This is the layer of decentralized finance (DeFi) platforms, NFT marketplaces, blockchain games, and social apps. In other words, it’s where people actually use crypto. Some examples are UniSwap, AAVE, and Curve.
Most users don’t consider consensus mechanisms or scaling solutions when they interact with blockchain. They’re using apps, interfaces, and wallets, and don’t see the clockwork-like mechanism that works underneath.
Why Layers Matter More Than Ever
As blockchain adoption grows, so does the need for better performance, lower costs, and smoother user experiences.
- Layered architecture allows innovation plus scalability without compromising security and specialized solutions for different needs. Instead of one system trying to do everything at once, multiple layers work together, each optimized for a specific role.
Bottom Line
Blockchain layers might seem complicated, but the idea is simple: break a complex system into smaller, more efficient parts. From the infrastructure that powers the network to the apps you use every day, each layer plays a role in making blockchain secure, decentralized, and scalable.
Explore the World of Blockchain with Tap
Whether you're interested in Layer 1 networks like Bitcoin and Ethereum, Layer 2 scaling solutions, or emerging ecosystems built on Layer 0 infrastructure, understanding how these layers work together helps you navigate the crypto space more confidently.
If you're ready to explore tokens across the entire blockchain stack, from widely known pioneers to cutting-edge DeFi platforms, you can find over 70 cryptocurrencies supported on Tap, giving you access to the projects shaping the future of decentralized technology.

In a string of new crypto assets available on Tap Global, Chainlink is one of the latest supported cryptocurrencies. The platform is renowned for being one of the biggest oracle platforms in the cryptosphere, making it possible for real-world data to communicate with blockchain applications.
Okay, so it's time to break down exactly what Chainlink is. You might be wondering why you should even care about this network when there are plenty of other decentralized projects out there. It all comes down to the fact that Chainlink aims to fix one obstacle that has prevented smart contracts from becoming more widespread in business and industry. Below we take a deeper look at what Chainlink is and what the platform has to offer.
What is Chainlink (LINK)?
Chainlink is a decentralized oracle platform designed to merge the blockchain world with the real world through data integration. The main aim of the platform is to allow smart contracts to capture real-world data, merging the two worlds.
Smart contracts are digital agreements that automatically execute when the agreed-upon conditions are met. Native to the blockchain industry, there is a significant gap between smart contracts capturing blockchain-specific data and external data like the weather, fiat currencies prices, sports scores, etc.
Bitcoin, for instance, has a very small range of these input capabilities, while Ethereum can handle more due to its smart contract functionality. Chainlink is designed to provide a far greater range of input across the blockchain space through its network of oracles.
These oracles are data providers that provide a bridge between smart contracts and external data sources. Each oracle is incentivized through a "reputation score" system to provide accurate data and rewarded accordingly with the platform's native token, LINK.
Who Created Chainlink?
In 2014, Sergey Nazarov and Steve Ellis created a platform called SmartContract which allows smart contracts to come to life by connecting them to external data and widely accepted bank payments. This acted as the prelude to what would become Chainlink.
The first version of Chainlink first emerged on the scene in mid-2017, founded by SmartContract. Three months later, the Chainlink whitepaper was launched by Navarov and Ellis. This was followed by a successful ICO which raised funds equating to $32 million, selling roughly 35% of the max supply of 1 billion LINK, funding the further development of the platform.
How does Chainlink works?
Alright, so now let's dig down into the nitty-gritty of how Chainlink works. Chainlink allows smart contracts to access external data. To do this, it provides an off-chain infrastructure that links smart contracts to all kinds of different data providers. This makes it much easier for smart contracts to get the information they need. The smart contract can then use this data in whatever way it needs to.
The first thing to understand is that smart contracts need external data in order to do their jobs. This makes sense, right? Your standard contract clearly specifies what happens when certain conditions are met. So what determines whether (and when) those conditions occur? Usually, it's some external force that a smart contract simply doesn't know about.
That means a blockchain-based smart contract can't fulfil its purpose without a way to get information from outside of the blockchain. So what do you do? You could have every individual app developer write their own oracles for each and every smart contract... or you can use a decentralized oracle network.
But what is the difference between centralized and decentralized oracles? Chainlink is great because it can be used to provide an 'outside view' to smart contracts... chainlink allows blockchain applications to securely access off-chain resources like traditional APIs, bank payments, and any other resource that's not currently on the blockchain.
Chainlink provides the security that developers need to run smart contracts without worrying about whether their favourite API is having problems. Chainlink also makes it possible for new data sources to be added to any smart contract which needs them.
Chainlink has three main processes in which it facilitates the communication of off-chain data with on-chain smart contracts. This is done through oracle selection, data reporting and result aggregation, as outlined below.
Oracle Selection
In this step, network users create a service-level agreement (SLA) outlining a set of desired data requirements. The platform then connects that SLA with relevant oracles providing that data. Parameters are then set and the user submits the SLA and deposits the required amount of LINK into what is called an Order-Matching contract, which is matched to the best bidding oracles.
Data Reporting
Oracles then acquire the necessary real-world data outlined in the SLA from external sources, process the information and send it back to the smart contracts operating on the Chainlink network.
Result Aggregation
The results obtained by the data oracles are then tallied in an Aggregation contract, which assesses the validity of the data. It then allocates a score of the sum of all the data received to the user. This "track record" is used to verify an oracle's integrity, keeping a log of its completed requests, amount of LINK staked and average response time.
Chainlink is also able to connect with oracles outside of its own blockchain network which is able to collect real-world data requested by the contracts. This process is managed by the Chainlink Core and Chainlink Adapter nodes.
The network uses a Proof-of-Stake (Pos) consensus, relying on a staking protocol to ensure the network's security.
How does Chainlink benefit me?
Chainlink is a decentralized oracle network that allows smart contracts to connect to external data sources. These can include APIs, internal systems, or other types of external data feeds. Chainlink's goal is to create a platform where developers aren't restricted from having their smart contracts interact with the outside world in any way they see fit.
You can start using Chainlink right away - no new platforms to learn, APIs to configure or other complex integrations.
chain link will never charge a fee for access to any of our oracle services. Our only source of revenue is the tokens you stake when retrieving outsourced data from your peers on the network.
What is LINK?
LINK is the native token to the Chainlink network and facilitates the communication of data. Considered to be an essential tool in merging blockchain technology with real-world applications, the token has gained wide popularity in the blockchain industry. Users use LINK to pay the nodes for their retrieving, verifying and sending of data. These prices are established by the node operator and based on the current market and demand for that data.
The node operators stake LINK in the Chainlink network to prove their commitment and good intentions. Nodes with bigger stakes take priority over nodes with smaller ones when matching them with SLAs.
LINK is an ERC20 token that powers the ChainLink Network. The LINK token serves three primary purposes:
- A method to pay ChainLink Node operators for the retrieval of data from off-chain data feeds, like web APIs and other inputs
- Incentivize the development of oracles that provide data to smart contracts.
- A method of staking by clients who want access to our oracle network.
The primary purpose of the LINK token is to secure the network by staking them. The user must stake a certain amount of LINK tokens to run a ChainLink node, which then acts as an oracle. In return, the user is paid for providing this service.
How to buy Chainlink
If you'd like to incorporate LINK in your crypto portfolio you can easily do so through our app. Simply trade any of your current crypto or fiat portfolios for LINK. You can as well purchase ChainLink using a credit card or debit card directly on Tap. We provide the most convenient means to purchase LINK using Visa or MasterCard. If you're ready to take the next step and want to buy some ChainLink, take the next step with Tap!

If you've been exploring the world of cryptocurrency beyond Bitcoin and Ethereum, you've probably heard of Sushi. No, not the Japanese dish – we're talking about a powerful player in the decentralised finance (DeFi) space that's been making waves since its dramatic entrance in 2020.
Sushi, or SushiSwap as the platform is called, burst onto the crypto scene with what many called a "vampire attack" on Uniswap, another popular decentralised exchange (DEX). This bold move involved attracting over a billion dollars of liquidity from its competitor in just a few days.
Today, SushiSwap stands as one of the leading decentralised exchanges in the crypto ecosystem, offering a suite of financial services that go well beyond simple token swapping. With its native SUSHI token, the platform has created an ecosystem that allows users to trade, earn, lend, borrow, and more – all without traditional financial intermediaries.
What makes Sushi truly stand out is how it's putting financial power back into the hands of regular users. By democratising access to sophisticated financial tools that were once only available to privileged institutions, Sushi is helping to create a more open, accessible financial system for everyone.
What is Sushi (SUSHI)?
At its core, Sushi is a DEX and DeFi protocol that allows users to trade cryptocurrencies directly with each other without any middlemen. Unlike centralised exchanges, there's no company controlling your funds or verifying your identity – it's just you, smart contracts, and the blockchain.
Think of SushiSwap as an online marketplace where instead of a company facilitating trades, everything runs on code. It's like if eBay operated without eBay the company – just buyers and sellers interacting through an automated system.
The relationship between SushiSwap and SUSHI is important to understand:
- SushiSwap is the platform – the actual decentralised exchange and suite of DeFi services
- SUSHI is the native token that powers the ecosystem – like owning a piece of the project
The Sushi ecosystem has evolved significantly since its launch, now offering a full menu of DeFi services:
- Token swapping (the basic exchange function)
- Liquidity providing (where users can earn fees)
- Yield farming (earning rewards by supporting the platform)
- Lending and borrowing
- Token launches
- NFT marketplace
- Cross-chain functionality (operating across multiple blockchains)
When compared to other DEXs like Uniswap and PancakeSwap, Sushi stands out for its community-first approach and wide range of features. While Uniswap pioneered the automated market maker model that Sushi uses, Sushi expanded on this foundation by adding more ways for users to participate and earn rewards.
And while PancakeSwap operates primarily on the Binance Smart Chain, Sushi has expanded to multiple blockchains, including Ethereum, Polygon, Avalanche, and more.
The history of Sushi
Sushi's history reads like a crypto soap opera – complete with controversy, drama, and unexpected twists. Grab the popcorn.
It all began in August 2020 when an anonymous developer going by the name "Chef Nomi" created SushiSwap as a fork (essentially a copy with modifications) of Uniswap's code. But Chef Nomi didn't just launch a competitor; they executed what became known as a "vampire attack" – a strategy to drain liquidity from Uniswap by offering better incentives.
Users who provided liquidity to Uniswap could stake their LP (liquidity provider) tokens on SushiSwap to earn SUSHI rewards. Then, in a coordinated event called "The Migration," over $1 billion in crypto assets moved from Uniswap to SushiSwap virtually overnight. The crypto community was stunned by the aggressive yet innovative approach.
But the drama was just beginning. Shortly after the successful migration, Chef Nomi suddenly converted a large amount of SUSHI tokens (worth about $14 million at the time) into Ethereum and withdrew it. The community viewed this as an "exit scam," and the price of SUSHI plummeted.
In a surprising turn of events, Sam Bankman-Fried, then-CEO of FTX (a major crypto exchange at the time), stepped in to take control of the project. Days later, Chef Nomi returned all the funds and apologised to the community.
Control of the project was then transferred to a multi-signature wallet controlled by several trusted community members, transitioning SushiSwap to true community governance. Since then, the protocol has seen steady development and expansion, including:
- Launch of Kashi lending platform (March 2021)
- Introduction of BentoBox, a yield-generating vault (Q1 2021)
- Expansion to multiple blockchains beyond Ethereum
- Release of Miso launchpad for new tokens
- Development of Shoyu, an NFT marketplace
Despite its tumultuous beginnings, Sushi managed to establish itself as a serious contender in the DeFi space through continuous innovation and a strong community focus.
How does SushiSwap work?
SushiSwap operates on a model called an automated market maker (AMM), which is fundamentally different from traditional exchanges. Here's how it works in simple terms:
Instead of matching buyers with sellers (the way stock exchanges work), SushiSwap uses liquidity pools – essentially big pots of cryptocurrencies that users can trade against. Imagine a vending machine that's always ready to exchange one token for another, rather than waiting to find someone who wants the opposite side of your trade.
These pools are created and maintained by liquidity providers – regular users who deposit pairs of tokens (like ETH and USDT) into the pools. In return for providing this liquidity, they earn fees from trades that happen in their pool.
When you want to swap tokens on SushiSwap, here's what happens:
- You select the tokens you want to exchange (for example, ETH for USDT)
- Smart contracts calculate the exchange rate based on the ratio of tokens in the relevant liquidity pool
- The more of one token you want, the more expensive it gets (this is called "slippage")
- A small fee (0.3% of the trade) is taken and distributed to liquidity providers
- The tokens are exchanged directly in your wallet
The beauty of this system is that it's all handled by smart contracts – self-executing code on the blockchain. There's no company processing your trade or holding your funds; it's all automated and trustless.
Of this 0.3% fee, 0.25% goes directly to liquidity providers in the pool, while the remaining 0.05% is converted to SUSHI tokens and distributed to SUSHI stakers. This creates a sustainable revenue model where active users earn from the platform's success.
Key features of the Sushi ecosystem
Sushi has evolved from a simple token exchange into a comprehensive DeFi ecosystem. Let's explore the main ingredients in Sushi's expanding menu:
SushiSwap DEX: The heart of the ecosystem is the decentralised exchange where users can swap virtually any ERC-20 token (and tokens on other supported blockchains). With competitive rates and deep liquidity across many trading pairs, it's the foundation of the Sushi experience.
Kashi: This lending and margin trading platform allows users to borrow assets against their crypto collateral. What makes Kashi unique is its isolated risk markets – meaning a problem in one lending market won't affect others, making it potentially safer than some competitors.
BentoBox: Think of this as a smart crypto savings account. BentoBox is a token vault that generates yield on deposited assets while they're waiting to be used in other Sushi products. It's like your money earning interest while sitting in your wallet, ready to use.
Onsen: This liquidity mining program incentivises users to provide liquidity for specific token pairs by offering additional SUSHI rewards. It's named after Japanese hot springs – places where people gather and relax, much like how Onsen gathers liquidity for the platform.
Miso: A launchpad for new tokens, Miso helps projects conduct token sales with various auction types. It's like Kickstarter for new crypto projects, helping them raise funds and distribute tokens fairly.
Shoyu: Sushi's NFT marketplace allows for the creation, buying, and selling of digital collectables. While newer than some competitors, it aims to offer lower fees and better integration with the rest of the Sushi ecosystem.
Cross-chain deployment: Unlike many DeFi protocols that only exist on Ethereum, Sushi has expanded to numerous blockchains including Polygon, Avalanche, Binance Smart Chain, Fantom, and more. This multi-chain approach helps users avoid Ethereum's sometimes high transaction fees while still accessing Sushi's services.
This diverse ecosystem makes Sushi a one-stop shop for many DeFi activities, allowing users to move seamlessly between trading, earning, lending, and more.
SUSHI tokenomics
The SUSHI token is the special sauce that brings the whole Sushi ecosystem together. Let's break down how it works:
Total supply: SUSHI has no maximum supply cap. New tokens are minted at a rate of 100 SUSHI per Ethereum block (roughly every 12 seconds), though this emission rate has been adjusted through governance votes over time.
Token utility: The SUSHI token serves several important functions:
- Governance: SUSHI holders can vote on proposals to change the protocol
- Fee sharing: When staked, SUSHI entitles holders to a portion of all trading fees
- Liquidity mining rewards: Users can earn SUSHI by providing liquidity
- Platform access: Some features may require SUSHI holdings or staking
Governance rights: Holding SUSHI means having a say in the future of the platform. Token holders can propose and vote on changes ranging from technical upgrades to treasury management and new feature development.
xSUSHI mechanism: When users stake their SUSHI tokens, they receive xSUSHI in return. This represents their share of the staking pool, which constantly grows as trading fees are added to it. When users unstake, they get their original SUSHI plus their portion of accumulated fees – making it a passive income opportunity.
Staking rewards: The current APY (Annual Percentage Yield) for staking SUSHI varies depending on platform volume and the number of stakers, but it has historically offered attractive returns compared to traditional finance.
Market performance: As with many cryptocurrencies, SUSHI has experienced significant price volatility since its launch. After reaching all-time highs during the 2021 bull market, the token has settled into a more stable trading range.
The tokenomics of SUSHI are designed to align the interests of users, liquidity providers, and token holders – when the platform succeeds, SUSHI holders benefit through increased value and fee sharing.
How to buy and sell SUSHI
Looking to get your hands on some SUSHI tokens? Here's how you can do it through the Tap app:
How to buy SUSHI on the Tap App:
- Download the Tap app from your device's app store
- Create an account and complete the required verification
- Fund your account using a supported payment method (bank transfer, card, etc.)
- Navigate to the crypto section and search for SUSHI
- Enter the amount you want to buy
- Review the transaction details and confirm your purchase
- Your SUSHI tokens will appear in your Tap wallet
How to sell SUSHI on the Tap App:
- Navigate to your SUSHI wallet in the app
- Select the Sell option
- Enter the amount you want to sell, and what currency you would like in return (crypto or fiat)
- Review and confirm the transaction details
- Your desired currency will appear in the relevant Tap wallet
Conclusion
Sushi has come a long way from its controversial beginnings to establish itself as a cornerstone of the DeFi ecosystem. What started as a fork of Uniswap has evolved into a comprehensive financial platform that offers trading, earning, lending, and more – all without traditional financial intermediaries.
By addressing one of the biggest pain points in DeFi – high Ethereum gas fees – through multi-chain deployment, Sushi makes decentralised finance more accessible to everyday users.
As with any cryptocurrency project, Sushi faces challenges and competition, but its innovative features, passionate community, and continuous development make it a project worth watching in the years to come.

Wanting to stake ETH but don't have the full 32 ETH required? Enter Rocket Pool – the game-changing protocol that's making Ethereum staking accessible to everyone.
Founded in 2016 and launched on mainnet in October 2021, Rocket Pool breaks down the barriers to Ethereum staking by allowing anyone to participate with as little as 0.01 ETH. Or, if you want to run a node, you'll need 8 ETH (plus some RPL as collateral) instead of the standard 32 ETH.
In this guide, we break down everything you need to know about the protocol, including its two key tokens:
- RPL: The governance token that also serves as insurance for the protocol
- rETH: A liquid token that represents your staked ETH and automatically grows in value as rewards accumulate
By democratising access to staking, Rocket Pool stays true to Ethereum's vision of decentralisation while making it possible for anyone to earn rewards from securing the network, with no massive ETH holdings required!
How Rocket Pool works
Rocket Pool's design has three main components that work together to facilitate decentralised ETH staking: smart contracts, smart node network and minipools.
The Smart Contracts Backbone
At the foundation of Rocket Pool lies a sophisticated set of smart contracts that govern all protocol operations. These contracts manage:
- Deposit pools where regular users stake their ETH
- The creation and management of minipools (validator nodes)
- The minting and burning of rETH tokens
- The staking and distribution of RPL rewards
- Protocol governance mechanisms
The smart contracts ensure that all operations happen in a trustless manner, removing the need for intermediaries and preserving the decentralised ethos of Ethereum. They incorporate various security measures, including extensive testing and multiple independent audits to safeguard user funds.
Key smart contracts include the Deposit Pool, Minipool Factory, and Token contracts. When users deposit ETH, the smart contracts either match them with node operators to create validators or mint rETH representing their stake and accumulated rewards.
Smart Node Network and Minipools explained
Rocket Pool's network consists of independent node operators running the Rocket Pool Smart Node software. This software interacts with the protocol's smart contracts and manages validator duties on the Ethereum network.
Node operators in Rocket Pool contribute 8 ETH (rather than the full 32 ETH required for solo staking), which is matched with 24 ETH from the protocol's deposit pool to form a standard 32 ETH validator. This validator unit is called a "minipool."
The process works as follows:
- A node operator installs and configures the Smart Node software
- They deposit 8 ETH and a minimum of 10% worth of ETH in RPL tokens as collateral
- The protocol matches this with 24 ETH from regular stakers
- A minipool (validator) is created and begins participating in Ethereum consensus
- When the validator earns rewards, they are split proportionally between the node operator and the deposit pool
This system creates a symbiotic relationship between those who want to stake without running infrastructure (regular stakers) and those willing to operate nodes but don't have the full 32 ETH requirement (node operators).
The minipool design is particularly innovative because it allows for fractional validator ownership while maintaining security through RPL collateral requirements. If a node operator behaves maliciously or negligently, their RPL collateral can be slashed, protecting regular stakers from potential losses.
Understanding RPL and rETH
As mentioned earlier, Rocket Pool's ecosystem revolves around two main tokens, each serving specific functions within the protocol.
What is RPL used for?
RPL (Rocket Pool Protocol Token) is the native utility and governance token of the Rocket Pool protocol, designed to align the interests of node operators with the long-term success of the protocol. Unlike rETH, which represents staked ETH, this ERC-20 token serves several specific functions:
- Node operator collateral: Node operators must stake a minimum of 10% of their ETH value in RPL tokens as security against wrongdoing. This collateral can be slashed if the node operator behaves maliciously, protecting the protocol and its users.
- Insurance mechanism: The RPL staked by node operators creates a protocol-wide insurance fund that helps secure user deposits and maintain trust in the system.
- Additional rewards: Node operators can stake up to 150% of their ETH value in RPL to receive proportional RPL rewards, incentivising greater security deposits and alignment with protocol success.
- Governance: RPL token holders have voting rights on protocol upgrades, parameter changes, and other governance decisions through the Rocket Pool DAO.
What is rETH and how does it work?
rETH is Rocket Pool's liquid staking token that represents staked ETH plus accumulated rewards. These automatically increase in value relative to ETH through a changing exchange rate rather than requiring separate reward claims.
How to stake ETH with Rocket Pool (step-by-step)
Staking ETH with Rocket Pool as a regular user (not a node operator) is straightforward and accessible to anyone with an Ethereum wallet. Here's a guide to getting started:
Option 1: Using the Rocket Pool dApp
- Connect your wallet: Visit the Rocket Pool website and navigate to the staking interface. Connect your Ethereum wallet (MetaMask, WalletConnect, etc.).
- Determine your stake amount: Decide how much ETH you want to stake (minimum 0.01 ETH).
- Approve the transaction: After reviewing the details, confirm the transaction in your wallet. This will swap your ETH for rETH at the current exchange rate.
- Receive rETH: Once the transaction is confirmed, you'll receive rETH in your wallet, representing your staked ETH plus future rewards.
Option 2: Using decentralised exchanges
- Access a DEX: Open a decentralised exchange that supports rETH/ETH pairs (Uniswap, SushiSwap, Balancer, etc.).
- Execute the swap: Trade your ETH for rETH through the exchange interface.
- Store your rETH: Keep your rETH in your wallet or utilise it in compatible DeFi protocols.
Monitoring your stake
Once you hold rETH, your rewards accumulate automatically through the increasing exchange rate between rETH and ETH. To monitor your rewards:
- Check the current rETH/ETH exchange rate on the Rocket Pool website or through blockchain explorers.
- Calculate the difference between the current value of your rETH holdings and your initial investment.
Remember that you don't need to claim rewards separately - they're built into the increasing value of your rETH tokens. When you eventually want to unstake, you can simply swap your rETH back to ETH through the Rocket Pool interface or a decentralised exchange.
How to become a Rocket Pool node operator
For those with technical expertise and a desire to become more actively involved in Ethereum's consensus mechanism, becoming a Rocket Pool node operator offers an opportunity to run validators with reduced capital requirements while earning additional rewards.
Prerequisites:
- 8 ETH for each minipool (validator) you wish to create
- At least 10% of your ETH value in RPL tokens as collateral (for maximum rewards, up to 150%)
- A computer or server that meets the minimum requirements:
- 4+ CPU cores
- 8+ GB RAM
- 100+ GB SSD storage
- Stable internet connection
- Basic command line knowledge
- Understanding of Ethereum staking principles
Step-by-step process:
- Set up your hardware and operating system: Either use a dedicated machine or a cloud service provider. Most node operators use Linux-based systems.
- Install Ethereum clients: Set up an execution client (Geth, Nethermind, etc.) and a consensus client (Prysm, Lighthouse, etc.).
- Install Rocket Pool Smart Node software: Follow the detailed instructions on the Rocket Pool documentation site to install the node software.
- Configure your node: Set up network settings, client preferences, and MEV-boost options if desired.
- Deposit ETH and RPL: Use the node software to deposit your 8 ETH and the required RPL collateral.
- Create your minipool: Once your deposits are confirmed, create a minipool which will be matched with 24 ETH from the deposit pool.
- Monitor and maintain your node: Keep your system updated, monitor performance, and participate in protocol governance if desired.
The future of Rocket Pool
As Ethereum continues to evolve, Rocket Pool is positioning itself for sustained growth and adaptation. In coming years, several key developments and trends will likely shape its trajectory.
Protocol upgrades:
The Rocket Pool development team has outlined an ambitious roadmap with several major upgrades:
- Saturn upgrade series: A comprehensive set of improvements focusing on scalability, capital efficiency, and user experience. The Saturn upgrade is a multi-phase initiative, with Saturn 0 completed and further phases underway.
- Distributed Validator Technology (DVT): Implementation of validator key distribution across multiple operators, enhancing security and reducing single points of failure.
- Greater MEV optimisation: Advanced strategies for maximising Maximal Extractable Value for stakers while maintaining ethical standards.
- Cross-chain expansion: Potential expansion to other proof-of-stake networks or layer-2 solutions that require validation services.
Scaling with Ethereum:
As Ethereum implements its scaling roadmap, Rocket Pool will adapt to support:
- Danksharding and proto-danksharding implementations
- Increasing validator requirements as Ethereum grows
- Adjustments to staking economics as Ethereum's monetary policy evolves
- Supporting specialised validation roles that might emerge in Ethereum's future
Market position and growth:
While Rocket Pool currently holds a smaller market share than some competitors, its emphasis on decentralisation potentially positions it well for sustainable growth. Here are key aspects worth keeping an eye on:
- Increasing regulatory scrutiny may favour more decentralised staking solutions
- Growing community awareness of centralisation risks could drive users toward Rocket Pool
- The protocol's conservative approach to security and upgrades builds long-term trust
How to buy Rocket Pool (RPL)
If you’re looking to accumulate Rocket Pool (RPL), you can do so securely and easily through the Tap app. Simply download the app, create an account and complete the identity verification process. Once verified, you can buy RPL with a wide range of supported cryptocurrencies or fiat currencies (through debit card or bank transfer). Ready to dive into the world of staking, or just go along for the ride? Tap’s ready for you.


.webp)


.webp)